Introduction
Microsoft Word is a powerful word processing tool that includes a spell check feature to help you catch and correct spelling errors. However, there are instances where the spell check may not work correctly, causing frustration and hindering your productivity. In this article, we will explore the potential reasons behind spell check issues in different versions of Microsoft Word and provide troubleshooting methods to resolve them.
1. Turn on Spell Check
The most common reason for spell check not working is that it may be turned off. If you haven’t enabled automatic spell-checking, the tool won’t function as you expect.
Microsoft Word for Mac: Go to Word > Preferences > Spelling & Grammar, and check the box against “Check spelling as you type“
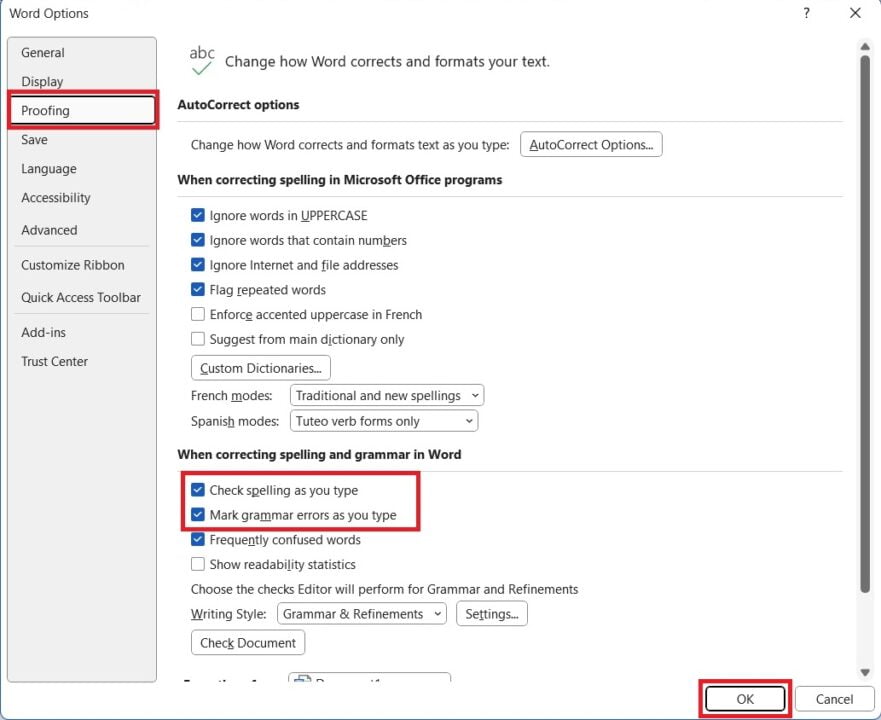
Microsoft Word for Windows: Go to File > Options > Proofing and check the box for “Check spelling as you type“.

2. Language Settings
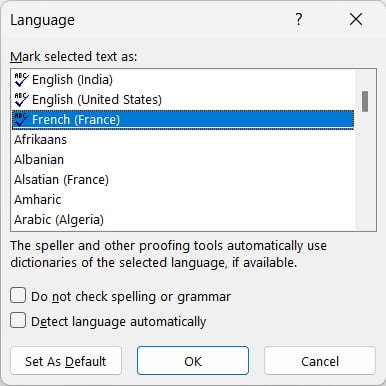
The second most common reason for spell checks not working in Microsoft Word is incorrect language settings. Ensure that the language selected for your document matches the language you want to check. To check the language settings:
- Click on the “Review” tab in the Microsoft Word ribbon.
- Select the “Language” option.

- Verify that the correct language is selected for the text you want to check.

3. Proofing Tools Installation
If the spell check feature is not working at all, it is possible that the proofing tools necessary for spell checking are not installed. To check and install the proofing tools:
- Go to the “File” menu and select “Options”.
- Click on “Proofing” in the left-hand menu.
- Under the “When correcting spelling and grammar in Word” section, click on “Settings”.
- Ensure that the correct proofing tools are installed for the desired language.
- If the proofing tools are not installed, click on “Add or Remove Features” to install them.
4. Custom Dictionary
Microsoft Word allows you to add words to a custom dictionary, which may cause spell check issues if the custom dictionary is corrupt or contains incorrect entries. To fix this:
- Go to File > Options > Proofing and click “Custom Dictionaries”.
- Remove any unnecessary or corrupt custom dictionaries.
- If needed, add a new custom dictionary and ensure it is selected for spell checking.
5. AutoCorrect Settings
Microsoft Word’s AutoCorrect feature can sometimes interfere with the spell check function. To check and adjust the AutoCorrect settings:
- Go to the “File” menu and select “Options”.
- Click on “Proofing” in the left-hand menu.
- Click on “AutoCorrect Options”.
- Verify that the “Replace text as you type” option is not conflicting with the spell check function.
- Make any necessary adjustments to the AutoCorrect settings.
6. Document-Specific Issues
In some cases, spell check issues may be specific to a particular document. Try the following troubleshooting steps:
- Copy the content of the document to a new, blank document and check if the spell check works correctly.
- Save the document in a different file format (e.g., .docx to .doc) and check if the spell check functions properly.
- If the spell check works in a new document or different file format, the issue may lie within the original document itself.
- Consider checking for any formatting issues, hidden characters, or corrupted sections within the problematic document.
Conclusion
Spell check issues can be frustrating, but with the troubleshooting methods mentioned above, you should be able to resolve them in Microsoft Word. Remember to check your language settings, ensure the correct proofing tools are installed, review your custom dictionary, adjust AutoCorrect settings if necessary, and address any document-specific issues. By following these steps, you can ensure that the spell check feature in Microsoft Word works correctly, allowing you to produce error-free documents with ease.

C P Gupta is a YouTuber and Blogger. He is expert in Microsoft Word, Excel and PowerPoint. His YouTube channel @pickupbrain is very popular and has crossed 9.9 Million Views.


