Microsoft Word is a powerful tool for creating and formatting documents. One of its handy features is the ability to convert plain text into a structured table. In this blog post, we will guide you through the steps to convert text to a table in MS Word, along with some tips and tricks to enhance your table’s appearance.
Step-by-Step Guide to Converting Text to a Table
Step 1: Prepare Your Text
Before converting your text to a table, ensure it is properly formatted. The text should be organized in a way that Word can easily understand where the table rows and columns should be. One easy way is to use tabs, commas, or other delimiters to separate the text that will go into different cells on same row. Use new line for new row.
Use Delimiters Wisely: Choose delimiters that won’t appear within your data. Tabs and commas are common choices but ensure they won’t confuse the conversion process.
Example 1: Tab as delimiter
Name    Age     City
John    25      New York
Jane    30      Los Angeles
Doe     22      Chicago
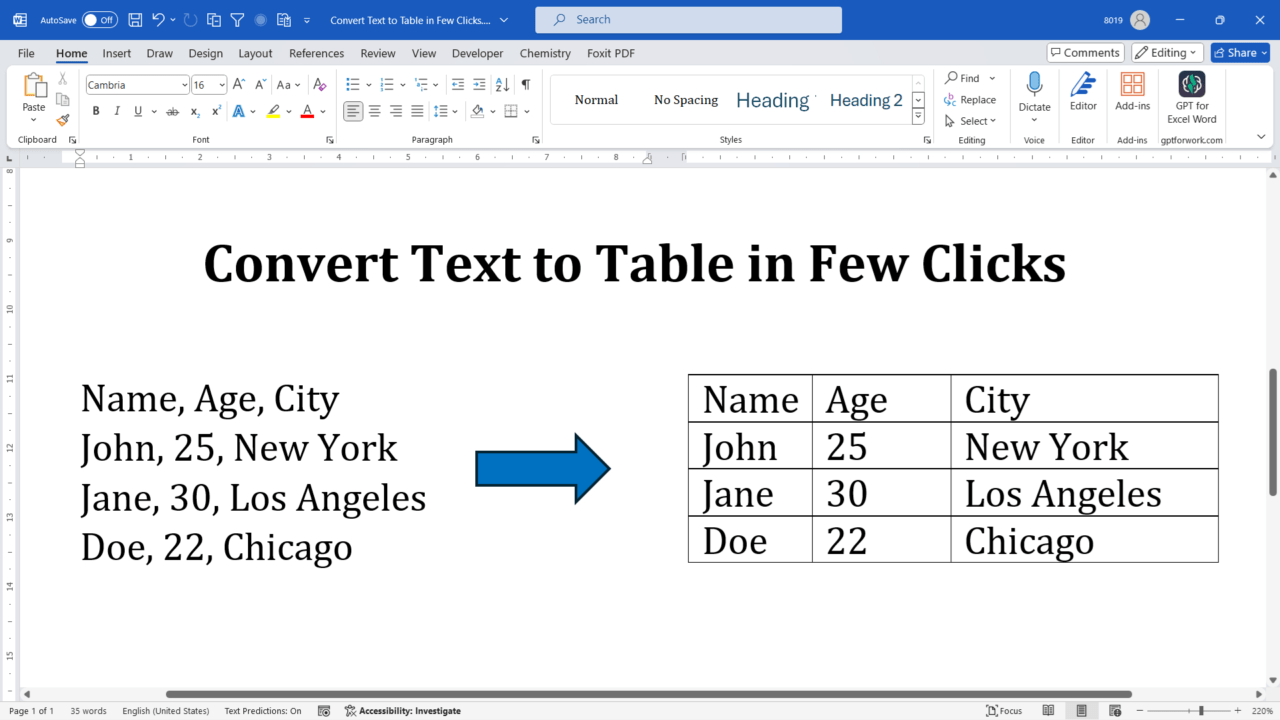
Example 2: Comma as delimiter
Name, Age, City
John Arnold, 25, New York
Jane Root, 30, Los Angeles
Doe Salt, 22, Chicago
Step 2: Select the Text
Select the text you want to convert into a table. Make sure you include all the text that should be part of the table, including the headers.
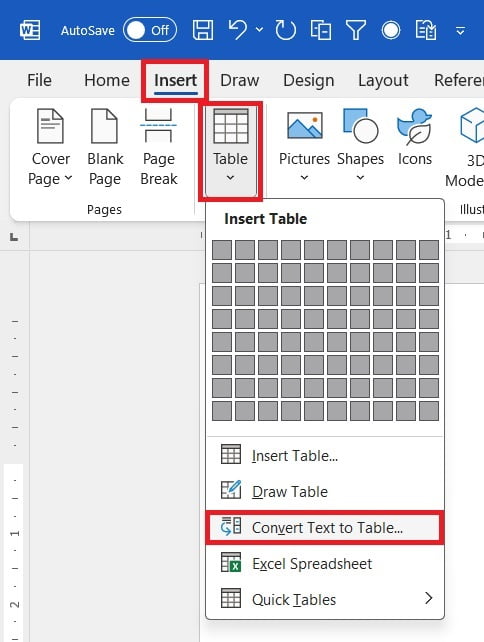
Step 3: Open the Convert Text to Table Dialog
Go to “Insert” tab > “Table” & select “Convert Text to Table…”
Ms Word (Windows) shortcut: Alt, a, v, x (press all keys one after other in quick succession
Step 4: Configure the Table Settings
In the “Convert Text to Table” dialog box, you can customize the table’s appearance and structure:
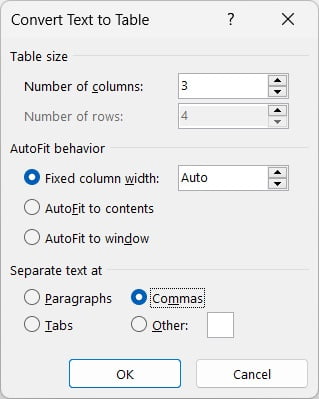
- Number of columns: Word will automatically detect the number of columns based on your text delimiters. You can adjust this if needed.
- Number of rows: Word will also detect the number of rows based on the lines of text.
- AutoFit behavior: Choose how the table should handle text fitting. You can select “Fixed column width,” “AutoFit to contents,” or “AutoFit to window.” Choose options as per your needs
- Separate text at: Select the delimiter that separates your text (tabs, commas, paragraph marks, or other characters as your need).
Step 5: Confirm and Insert the Table
Once you’ve configured the settings to your liking, click “OK.” Word will convert the selected text into a table according to your specifications.
Enhancing Your Table
After converting the text to a table, you can further enhance it using various formatting tools available in Word.
1. Table Styles
Go to “Table Design” tab on the Ribbon to apply a pre-designed table style. This can instantly improve the table’s appearance with color schemes, shading, and borders.
2. Adjusting Column Width and Row Height
Hover over the borders of the columns or rows to resize them. You can also use the “AutoFit” options under the “Layout” tab to adjust the table dimensions automatically.
3. Merging and Splitting Cells
Select the cells you want to merge or split, then use the options under the “Layout” tab to combine multiple cells into one or split a single cell into multiple cells.
4. Borders and Shading
Customize the borders and shading of your table for a professional look. Under the “Table Design” tab, you can change border styles, colors, and add shading to cells or rows.
5. Header Rows:
If your table has headers, consider repeating them on each page if the table spans multiple pages. This option is available in the “Table Properties” dialog under the “Row” tab.
Conclusion
Converting text to a table in MS Word is a straightforward process that can significantly enhance the readability and organization of your data. By following the steps outlined in this guide, you can create well-structured tables that improve the presentation of your information. Experiment with the various formatting options to make your tables not only functional but also visually appealing.
Related Posts

C P Gupta is a YouTuber and Blogger. He is expert in Microsoft Word, Excel and PowerPoint. His YouTube channel @pickupbrain is very popular and has crossed 9.9 Million Views.